
1. Build a candy wardrobe based on your wardrobe
.jpg) |
| Classic? Candy can have simple lines, neutral colours, sleek pieces |
.jpg) |
| Feminine? Candy can have soft colours, delicate pieces |
.jpg) |
| Rock chic? Candy can have studs, leather, chains, skulls |
.jpg) |
| Relaxed? Candy can have subtle metallics & geometrics, nothing too flashy |
.jpg) |
| Trend driven? Candy can have fluoro, texture, brights, cords & tassels |
 |
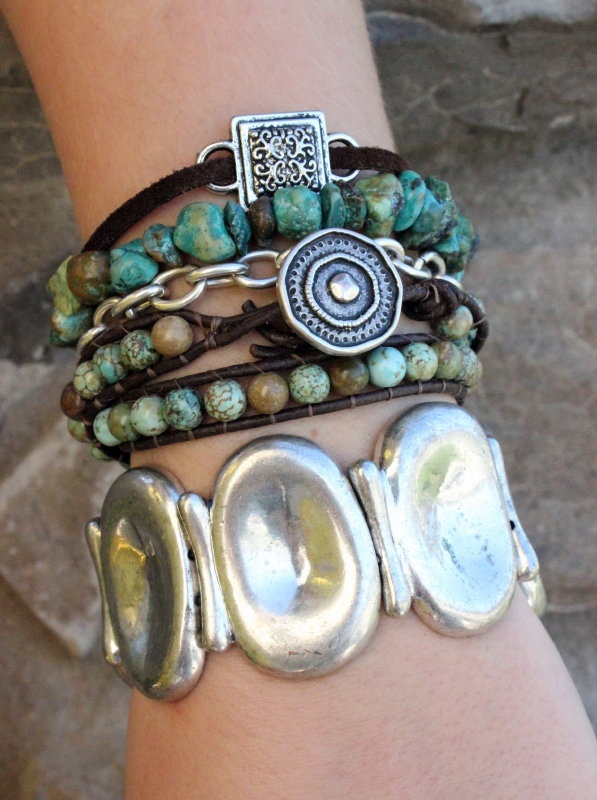
| Bohemian? Candy can have beaten metal, turquoise, cords & leather |
2. Mixing candy metals is totally OK

3(a): Be bold: A stack on each arm


3(b): or a stack only on one arm

For beginners, a one arm stack may be easier, unless its like this.....
 |
| Dont try this at home unless you're really confident. Really. |
4. Work the candy textures
Metals, resin, leather, patent, prints, plains, sparkles, enamel, cording, beads, matt, shiny, chains & studs.
Stick to a couple of textures if you are a beginner. Otherwise go to town with texture.


.jpg)

5(a): Tone the colours back to your outfit


5(b): or play contrast
.jpg)


6. Stick to metals for an easy start


7. Petite? Short stack & not too chunky


8. Know your size preference.
Foe petites, its best that the candy isnt floppy and hugs your arm rather than your wristbone.


Bangles can be noisy & annoying, so select accordingly.

I often re-thread bracelets so they sit at the perfect spot on my wrist.

Be realistic - alot of these photos are styled so the candy sits just so - in real life, things are not quite so.


9. One larger statement piece helps to create "a look"
.jpg)

.jpg)
The more experienced can stack many statement pieces


10. A stack of similar pieces also creates a fashionable impression.


Word of advice: If you do a stack of similar candies, keep it to one arm only - I find unless you have a really good eye for colour, it tends to look a bit mundane when its done on both arms.
So how do you get the arm candy wardrobe going?
Step 1: Start with a base of 2-3 metal base bracelets.
Step 2: Add 3-4 coloured ones (colour can be white or black).
Step 3: Add one stand out bracelet which tones in with your preferred style.
Classic? The stand out may be a Hermes style leather wrap.
Boho? The stand out may be a beaten silver with large turquoise stones.
Girly? The stand out may be a large enameled floral bracelet or large metal links.
Minimalist? The stand out may be a sleek metal cuff.
Rock chic? The stand out may be a black distressed studded cuff.
As your collection grows I encourage you to move away from your preferred style in the stand out bracelet. Its good to stay within your style when you're starting out, but moving away will add interest & flair to your look.
Its easier to go off-style for Step 1 & Step 2 as those items dont make such a massive impact on the look - they act more as fillers rather than the main attraction. But dont under estimate their value - the fillers add depth & personality and fine tune the look.
I also encourage you to work to two stand outs on the arm & about 6-8 fillers as you become more confident with stacking arm candy.
Always, shop your closet - pull out any bracelets you have & display them so you are more likely to include them in an ensemble.
Shop at the discount stores and all the accessory trend stores like Diva & Lovisa for cheapest prices. These stores are especially good for the fillers. Dont by-pass childhood pick fillers like friendship bracelets & plastic bead bracelets.
As your budget grows you can add fine jewellery and semi precious stones as well as leather accents. I'd be moving on to the department stores and the designer brands for these.
So where to from here?
Find an outfit you want to wear arm candy with.
Spend some time studying the pictures to develop a list of potential candy purchases.
In fact, I'd take the outfit with you to the shops & see what transpires!
Have fun!
No comments:
Post a Comment